JAKA ROS2 Instruction Manual
JAKA ROS2 Instruction Manual
Table of Contents
Introduction
1.1. ROS 2 Overview
1.2. Purpose and Scope
1.3. JAKA ROS2 Package Structure
1.4. Supported Platforms and System Requirements
1.5. ROS2 Basic CommandsInstallation and Setup
2.1. Prerequisites
2.2. Installing the JAKA ROS 2 Package
2.3. Switching to a Different SDK VersionJAKA ROS 2 Workspace Overview
3.1. Overview of JAKA ROS 2 Packages
3.2. JAKA Driver Package (jaka_driver)
3.3. JAKA Planner Package (jaka_planner)Getting Started (Tutorials)
4.1. Basic Tutorial: Controlling JAKA Robot with jaka_driver Package
4.2. MoveIt 2 Tutorial: Planning and Execution
4.3. Gazebo Simulation Tutorial: Real-Time Trajectory Execution in Gazebo
4.4. Real Robot Tutorial: Controlling Real JAKA Robot
4.5. Running moveit_test for Basic Motion Testing
Introduction
1.1. ROS 2 Overview
- ROS (Robot Operating System) is a collection of open-source software libraries and tools that provide a flexible framework for developing and running robot applications.
- ROS 2 is the successor to ROS 1. It introduces improvements in performance, security, and real-time support, making it suitable for both research and industrial applications.
- ROS 2 organizes code into packages, which are built together in a workspace using
colcon. Each package may contain one or more nodes that communicate via topics, services, or actions. - The JAKA ROS 2 package primarily uses:
- Topics to send robot state data.
- Actions to handle long-running tasks (e.g., motion execution).
- Services for quick commands (e.g., enabling the robot).
1.2. Purpose and Scope
Purpose
This document provides guidelines for installing and configuring the JAKA ROS 2 package, along with step-by-step tutorials for both simulation and real robot operation.
It is intended for developers familiar with basic ROS 2 concepts who want to integrate JAKA robots into their applications.
Scope
JAKA Robot Models
The current release of the JAKA ROS 2 package supports all officially available JAKA 6-DOF cobot models, including the JAKA Zu 3, JAKA Zu 5, JAKA Zu 7, JAKA Zu 12, JAKA Zu 18, JAKA Zu 20, JAKA Zu 30, JAKA S 5, JAKA S 7, JAKA S 12, JAKA Pro 5, JAKA Pro 7, JAKA Pro 12, JAKA Pro 16, JAKA Pro 18, JAKA A 5, JAKA A 12, JAKA C 5, JAKA C 7, JAKA C 12, and JAKA MiniCobo。 All configuration files, drivers, and tutorials in this manual are designed for these models.
Software Features Within Scope:
- MoveIt Integration: Motion planning and execution, including collision checking, kinematics, and trajectory generation.
- RViz Visualization and Simulation:
- Real-time visualization of robot models, joint states, and planned trajectories.
- Although RViz is primarily a visualization tool, the package provides a basic simulation-like environment to preview planned motions and interact with the robot’s states.
- Gazebo Simulation Environment: Full dynamic simulation of robots, including physics interactions and real-world dynamics. Gazebo is ideal for testing control algorithms and the dynamic response of the robot in a realistic simulated environment.
- Control Driver Interface: A ROS 2 driver node for sending commands to the robot’s controller and receiving feedback on its state.
1.3. JAKA ROS2 Package Structure
The two flowcharts below illustrate the package structure for JAKA ROS1 and JAKA ROS2 packages, respectively.


In transitioning from ROS 1 (Catkin) to ROS 2 (Colcon), the layout of the JAKA robot packages remains mostly the same, but the build and installation process has changed.
Below is an overview of the key differences and why they matter.
1.3.1 Comparison with ROS 1
ROS 1 (Catkin):
build/: Holds CMake’s intermediate compilation files.devel/: Contains development-linked binaries, scripts, and other runtime resources.install/: Often used for optional final installation outputs (less commonly used during normal development).
ROS 2 (Colcon):
build/: Still contains intermediate build artifacts.install/: Now serves as the main directory for runtime files—replacing the functionality ofdevel/.log/: Stores build logs and debugging information.
1.3.2 Why the Change?
Clarity & Modularity: By separating build artifacts (
build/) from final install artifacts (install/), ROS 2 makes it clearer what’s used at runtime vs. what’s needed for building.Package Isolation: Colcon enforces a more consistent workspace structure, reducing dependency conflicts and easing deployment to other systems.
1.4. Supported Platforms and System Requirements
The JAKA ROS 2 package is designed to provide seamless integration of JAKA collaborative robots within the ROS 2 ecosystem.
To ensure stability and performance, this package has been tested and verified on specific software and hardware configurations, which are outlined below.
1.4.1 Supported ROS 2 and Gazebo Distributions
- Currently, this package is officially tested and supported on Ubuntu 22.04 (Jammy Jellyfish) with ROS 2 Humble. While this package is primarily tested on ROS 2 Humble, it may be possible to build and run it on ROS 2 Galactic or Iron, but compatibility is not guaranteed.
- This package is designed to work with Gazebo Ignition Fortress, which is the recommended simulation environment for ROS 2 Humble and provides stable, high-performance physics-based simulations. The package has also been tested on Gazebo Classic, and while functional, it is not recommended due to being outdated for ROS 2 Humble. Users may experience instability and performance issues.
- Future releases of this package may extend support for newer ROS 2 and Gazebo distributions as they become officially available.
1.4.2 Supported Controller Versions
To ensure optimal performance and compatibility with the JAKA ROS 2 package, we have established specific requirements for the controller firmware. The minimal supported controller version is 1.7.1.46, which provides the essential functionalities required for basic operations. For improved stability, enhanced features, and seamless integration with both ROS 2 and MoveIt 2, the recommended controller version is 1.7.2.16. We advise users to upgrade to the recommended version, as it has been thoroughly tested and is currently the latest available version.
1.4.3 Minimum Hardware Requirements
The following table displays the recommended minimum system requirements based on ROS 2 and MoveIt 2's typical resource consumption, as well as industry best practices for running robotic applications efficiently.
| Component | Recommended Minimum Requirement | Notes |
|---|---|---|
| Processor (CPU) | 64-bit Intel i5 / i7 (or equivalent AMD) | Multi-core CPU recommended for running motion planning and real-time sensor processing. |
| RAM | 8 GB RAM minimum (16 GB recommended) | MoveIt 2 motion planning and RViz visualization require significant memory. |
| Storage | 20 GB free space (SSD preferred) | Faster storage improves launch times and data processing. |
| GPU (Optional) | NVIDIA GPU with CUDA support | Not required for basic functionality but beneficial for advanced perception applications (e.g., AI-based vision processing, real-time SLAM). |
1.5. ROS2 Basic Commands
In this section, we introduce fundamental ROS 2 commands that are commonly used when working with the JAKA ROS 2 package. These commands allow users to build, run, and debug ROS 2 nodes, manage topics, services, parameters, and launch files.
Unlike ROS 1, ROS 2 introduces a more modular and flexible system, using Colcon for building workspaces, DDS (Data Distribution Service) for communication, and replacing commands like rostopic, rosnode, and rosservice with the ros2 CLI tool.
The table below provides a summary of essential ROS 2 commands and their functions.
| Command | Description |
|---|---|
cd ~/<ros2_ws> | Navigate to the ROS 2 workspace directory. |
colcon build | Compiling ROS 2 packages (equivalent to catkin_make in ROS 1). |
source ./install/setup.bash | Add the package to the environment variable (equivalent to source ./devel/setup.bash in ROS 1). |
ros2 pkg list | View all available packages. |
ros2 pkg prefix <package-name> | Find a package installation directory. |
ros2 run <package-name> <executable-name> | Run a ROS 2 node. |
ros2 node list | View all running nodes. |
ros2 node info <node-name> | View node-specific information. |
ros2 node kill <node-name> | Stop a running node. |
ros2 topic --help | See all available topic operations. |
ros2 topic list | View all active topics. |
ros2 topic echo /<topic_name> | Display messages from a topic in real time. |
ros2 topic info /<topic_name> | View topic information (message type, publishers, subscribers, etc.). |
ros2 topic type /<topic_name> | View the message format of a topic. |
ros2 interface show <msg_type> | Display details of a specific message type (equivalent to rosmsg show in ROS 1). |
ros2 service --help | View all service operations. |
ros2 service list | View the list of active services. |
ros2 service call <service-name> <service-type> {argument} | Call a service manually. |
ros2 launch <package_name> <file.launch.py> | Run a launch file. |
ros2 param list | View available parameters of a node. |
ros2 param get <node-name> <param-name> | Get the value of a parameter. |
ros2 param set <node-name> <param-name value> | Set a parameter's value. |
ros2 bag record /<topic_name> | Record messages from a topic into a ROS 2 bag file. |
ros2 bag play <bag_file> | Replay messages from a recorded bag file. |
ros2 bag info <bag_file> | View details of a recorded bag file. |
ros2 doctor | Diagnose and check the ROS 2 environment. |
Installation and Setup
2.1. Prerequisites
Before installing and using the JAKA ROS 2 package, ensure that your system meets the necessary software requirements. This includes setting up a compatible operating system, installing ROS 2 and its dependencies, and configuring additional tools required for motion planning and execution.
The following sections provide a step-by-step guide to preparing your environment.
2.1.1 Operating System
To ensure compatibility and stability, the JAKA ROS 2 package requires:
- Ubuntu 22.04 (Jammy) OS with x86_64 architecture.
- ROS 2 Humble as the middleware framework.
2.1.2 ROS 2 Installation
For Ubuntu Jammy (22.04) with x86_64 architecture, follow the official installation guide for ROS 2 Humble on: ROS 2 Humble Installation.
For convenience, here is a brief summary of the required steps.
1) Set Locale
Ensure that your system supports UTF-8 locale:
locale  # check for UTF-8
sudo apt update && sudo apt install locales
sudo locale-gen en_US en_US.UTF-8
sudo update-locale LC_ALL=en_US.UTF-8 LANG=en_US.UTF-8
export LANG=en_US.UTF-8
locale  # verify settings
2) Setup ROS 2 Package Sources
First, enable the Ubuntu Universe repository:
sudo apt install software-properties-common
sudo add-apt-repository universe
Then, add the ROS 2 GPG key:
sudo apt update && sudo apt install curl -y
sudo curl -sSL https://raw.githubusercontent.com/ros/rosdistro/master/ros.key -o /usr/share/keyrings/ros-archive-keyring.gpg
Finally, add the ROS 2 repository to your sources list:
echo "deb [arch=$(dpkg --print-architecture) signed-by=/usr/share/keyrings/ros-archive-keyring.gpg] http://packages.ros.org/ros2/ubuntu $(. /etc/os-release && echo $UBUNTU_CODENAME) main" | sudo tee /etc/apt/sources.list.d/ros2.list > /dev/null
3) Install ROS 2 Humble
Update and upgrade the system before installation:
sudo apt update
sudo apt upgrade
Choose an installation type:
Desktop Install (Recommended): Includes ROS, RViz, demos, and tutorials.
sudo apt install ros-humble-desktopROS-Base Install (Minimal Setup): Includes core ROS 2 communication tools but no GUI tools.
sudo apt install ros-humble-ros-baseDevelopment Tools (For Building Packages): can be installed alongside any option if developing or compiling ROS 2 packages.
sudo apt install ros-dev-tools
4) Environment Setup
Each time a new terminal is opened, source ROS 2 to set up the environment:
source /opt/ros/humble/setup.bash
To automatically source it in the .bashrc file:
echo "source /opt/ros/humble/setup.bash" >> ~/.bashrc
source ~/.bashrc
Note: For users of different shells (e.g., zsh), replace .bash with .zsh or .sh accordingly.
2.1.3 Additional dependencies
MoveIt2 Installation
MoveIt 2 is required for motion planning and execution. Ensure MoveIt 2 (version 2.2+ recommended) is installed before using the JAKA ROS 2 package.
Follow the official MoveIt 2 documentation for installation: Binary installation (official Debian package via apt): MoveIt 2 Binary Installation.
sudo apt update
sudo apt install ros-humble-moveit
source /opt/ros/humble/setup.bash
Gazebo Fortress Installation
- This package supports Gazebo Fortress for simulation with ROS 2 Humble. Ensure that ROS 2 integration with Gazebo Fortress is properly set up by installing the ros-gz bridge package.
- To install Gazebo Fortress, follow the official Ignition Gazebo installation guide: Gazebo Fortress Binary Installation.
1) Install some necessary tools:
sudo apt-get update
sudo apt-get install lsb-release gnupg
2) Install Ignition Fortress:
sudo curl https://packages.osrfoundation.org/gazebo.gpg --output /usr/share/keyrings/pkgs-osrf-archive-keyring.gpg
echo "deb [arch=$(dpkg --print-architecture) signed-by=/usr/share/keyrings/pkgs-osrf-archive-keyring.gpg] http://packages.osrfoundation.org/gazebo/ubuntu-stable $(lsb_release -cs) main" | sudo tee /etc/apt/sources.list.d/gazebo-stable.list > /dev/null
sudo apt-get update
sudo apt-get install ignition-fortress
3) Install ROS 2 integration (ros-gz Bridge): to allow communication between ROS 2 Humble and Gazebo Fortress.
sudo apt install -y ros-humble-ros-gz
4) Set up environment variables:
echo 'source /usr/share/gz/setup.bash' >> ~/.bashrc
source ~/.bashrc
5) Additional Configuration for Ubuntu Virtual Machine Users If you are running Gazebo Fortress inside a virtual machine, you may experience flickering grids or a blank rendering window due to limited hardware acceleration. To fix this, force software rendering by adding:
echo 'export LIBGL_ALWAYS_SOFTWARE=true' >> ~/.bashrc
source ~/.bashrc
2.2. Installing JAKA ROS 2 Package
1) Cloning from GitHub or Downloading Release
To obtain the JAKA ROS 2 package, you can either:
Clone the repository from GitHub:
a. Clone with HTTPS:git clone https://github.com/JakaCobot/jaka_ros2.gitb. Clone with SSH:
git clone git@github.com:JakaCobot/jaka_ros2.gitDownload the latest release from the official source and extract the package.
2) Building with colcon
Once the package is obtained, navigate to the workspace and build it using colcon:
cd <path-to-where-the-repository-is-cloned-or-extracted>/jaka_ros2/src
colcon build --symlink-install
3) Terminal Environment Setup
After building the workspace, source it to use the package:
source ~/jaka_ros2/install/setup.bash
To automatically source it every time a terminal is opened:
echo "source ~/jaka_ros2/install/setup.bash" >> ~/.bashrc
source ~/.bashrc
This completes the installation and setup process for the JAKA ROS 2 package. You are now ready to proceed with using the package for robot control and motion planning.
2.3. Switching to a Different SDK Version
The JAKA ROS 2 package is currently based on JAKA SDK version 2.2.2, which is the latest available version. However, if you need to use the package with an earlier SDK version, such as version 2.1.14, follow the steps below to adjust your setup accordingly.
Steps to Switch SDK Versions:
1) Download the Desired SDK Package
Visit JAKA's official website to download the SDK version you wish to use: JAKA Downloads.
2) Replace the libjakaAPI.so File
a) Navigate to the lib directory within both the jaka_driver and jaka_planner packages in your installed JAKA ROS 2 workspace.
b) Replace the libjakaAPI.so file with the version provided in the downloaded SDK.
c) For version 2.1.14, the libjakaAPI.so file can be found in the following directory within the unzipped SDK folder: 20241018100240A001/Linux/c&c++/x86_64-linux-gnu/shared
3) Replace the Header Files
a) Navigate to the following include directories in your installed JAKA ROS 2 workspace:
jaka_driver/include/jaka_driverjaka_planner/include/jaka_planner
b) Replace the following header files with their counterparts from the downloaded SDK:
JAKAZuRobot.hjkerr.hjktypes.h
c) For version 2.1.14, these files can be found in the following directory within the unzipped SDK folder: 20241018100240A001/Linux/c&c++/inc_of_c++
4. No Need to Modify conversion.h
The conversion.h file in jaka_driver/include/jaka_driver is not part of the JAKA SDK and does not require any changes. You can leave this file as it is.
By following these steps, you will successfully switch to a different SDK version (such as 2.1.14) in your JAKA ROS 2 workspace, ensuring compatibility with the selected SDK version.
JAKA ROS 2 Workspace Overview
This chapter provides an overview of the JAKA ROS 2 workspace, detailing its key components, nodes, executables, topics, services, and actions.
3.1. Overview of JAKA ROS 2 Packages
As shown in Figure 1-2, the JAKA ROS 2 workspace consists of multiple packages, each serving a distinct purpose in integrating JAKA collaborative robots with ROS 2.
- jaka_driver: Startup control driver package including source code, SDK library, and launch files for the low-level driver interface.
- jaka_planner: Provides motion planning capabilities using MoveIt 2, including planning-related configuration and launch files, and action-based trajectory execution.
- jaka_msgs: Contains custom message and service definitions used across other packages.
- jaka_description: Holds URDF, meshes, and configuration files for describing the robot model.
- jaka_
<robot_model>_moveit_config: Separate MoveIt package for each supported JAKA cobot model (<robot_model>:zu3,s5,a12,minicobo, etc.) with each including MoveIt 2 configuration files, RViz visualization settings, and YAML parameter files.
3.2. JAKA Driver Package (jaka_driver)
The jaka_driver package is responsible for low-level robot communication and control. It provides ROS 2 services and topics for motion control, configuration, and status reporting.
It contains the following key components.
3.2.1 Node and Executables
The following table provides an overview of the executables in jaka_driver package, their associated nodes, and their functions.
| Executable | Node Name | Purpose |
|---|---|---|
| jaka_driver.cpp | jaka_driver | The main driver node that initializes the robot and handles ROS 2 topics and service calls for state management, I/O, and motion control. |
| client.cpp | linear_move_client | A ROS 2 client node that sends service requests to the /jaka_driver/linear_move service to command the robot to move linearly based on user-specified poses and motion parameters. |
| sdk_test.cpp | moveit_server | Tests the JAKA robot SDK by connecting to the robot, enabling it, and retrieving joint positions to verify communication and status information. |
| servoj_demo.cpp | client_test | Enables the robot's servo mode using the /jaka_driver/servo_move_enable service to switch the robot into servo mode. After enabling servo mode, it uses the /jaka_driver/servo_j service to incrementally move the robot's joints to predefined positions, hence creating a continuous motion effect. |
3.2.2 Services
The jaka_driver node provides various services categorized as follows:
Motion Control Services
- /jaka_driver/linear_move - Executes linear motion in the user coordinate system.
- /jaka_driver/joint_move - Executes axis motion in the joint coordinate system.
- /jaka_driver/jog - Enables jogging control (continuous robot motion) in the joint coordinate system, user coordinate system, or tool coordinate system.
- /jaka_driver/servo_move_enable - Enables servo position control mode.
- /jaka_driver/servo_p - Controls motion in cartesian coordinate system in servo mode.
- /jaka_driver/servo_j - Controls motion in joint coordinate system in servo mode.
- /jaka_driver/stop_move - Stops the robot's motion.
Parameter Configuration Services
- /jaka_driver/set_toolframe - Configures TCP (Tool Center Point) parameters.
- /jaka_driver/set_userframe - Configures user coordinate system parameters.
- /jaka_driver/set_payload – Sets the robotic arm payload parameter.
- /jaka_driver/drag_move - Enables or disables free-drive mode.
- /jaka_driver/set_collisionlevel - Adjusts collision detection sensitivity.
IO & Kinematics Services
- /jaka_driver/set_io - Configures digital or analog IO values on the control panel, tool, or expansion interface.
- /jaka_driver/get_io - Retrieves digital or analog IO values from the control panel, tool, or expansion interface.
- /jaka_driver/get_fk - Computes forward kinematics.
- /jaka_driver/get_ik - Computes inverse kinematics.
3.2.3 Topics
The jaka_driver node publishes real-time robot status updates through the following topics:
- /jaka_driver/tool_position - End-effector position and orientation.
- /jaka_driver/joint_position - Joint position information.
- /jaka_driver/robot_states - Overall robot status and events information.
3.3. JAKA Planner Package (jaka_planner)
The jaka_planner package provides trajectory planning and execution using MoveIt 2. It contains the following key components.
3.3.1 Node and Executables
The following table provides an overview of the executables in jaka_planner package, their associated nodes, and their functions.
| Executable | Node Name | Purpose |
|---|---|---|
| moveit_server.cpp | moveit_server | Handles trajectory execution and robot state monitoring. It connects to the robot, enables servo mode, and processes trajectory goals for motion planning and execution. |
| moveit_test.cpp | jaka_planner | Test node for MoveIt 2 motion planning. It demonstrates motion planning in joint space and Cartesian space and executes planned trajectories using the move_group interface. |
3.3.2 Topics
- /joint_states - Publishes robot joint states for MoveIt 2 and RViz visualization.
3.3.3 Actions
The jaka_planner package provides an action server for executing planned trajectories:
- Action Name:
/jaka_<robot_model>_controller/follow_joint_trajectory(<robot_model>:zu3,s5,a12,minicobo, etc.) - Message Type:
control_msgs::action::FollowJointTrajectory - Functionality:
- Receives and executes joint trajectory goals.
- Monitors execution progress.
- Provides continuous state updates and confirms completion.
Getting Started (Tutorials)
4.1. Basic Tutorial: Controlling JAKA Robot with jaka_driver Package
The jaka_driver package is a control driver that enables communication with the JAKA robot via ROS 2 services and topics.
This section provides example service calls and executable runs that request various services or SDK functions to send basic control commands to the robot and check its status.
4.1.1 Starting the JAKA ROS 2 Driver
Before executing robot commands, the jaka_driver node must be started. Use the following command to launch the driver and establish a connection with the robot:
ros2 launch jaka_driver robot_start.launch.py ip:=<robot_ip>
Note: Replace
<robot_ip>with the actual IP address of your robot. This parameter is required for successful communication.

4.1.2 Example Service Commands
The following examples demonstrate how to send control commands to JAKA robots using the jaka_driver package.
1) Executing Joint Motion
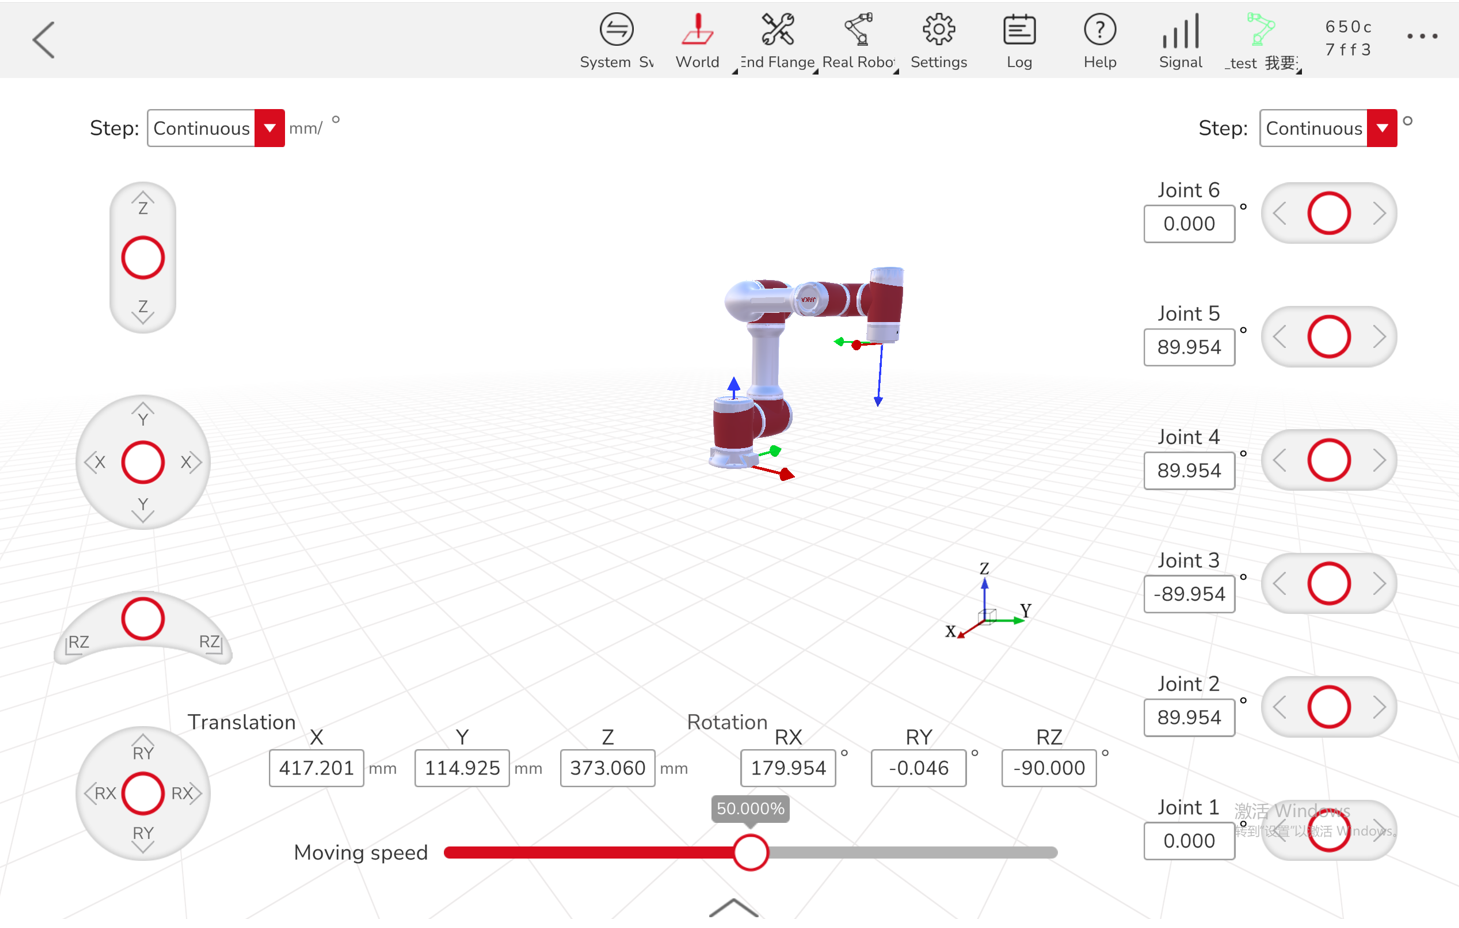
To move the robot in the joint coordinate system, call the /jaka_driver/joint_move service with the appropriate parameters as follows:
ros2 service call /jaka_driver/joint_move jaka_msgs/srv/Move "{
  pose: [0, 1.57, -1.57, 1.57, 1.57, 0],
  has_ref: false,
  ref_joint: [0],
  mvvelo: 0.5,
  mvacc: 0.5,
  mvtime: 0.0,
  mvradii: 0.0,
  coord_mode: 0,
  index: 0
}"
Note: The joint motion interface is blocking by default. To use a non-blocking interface, modify the corresponding parameter in jaka_driver.cpp.

2) Executing Linear Motion
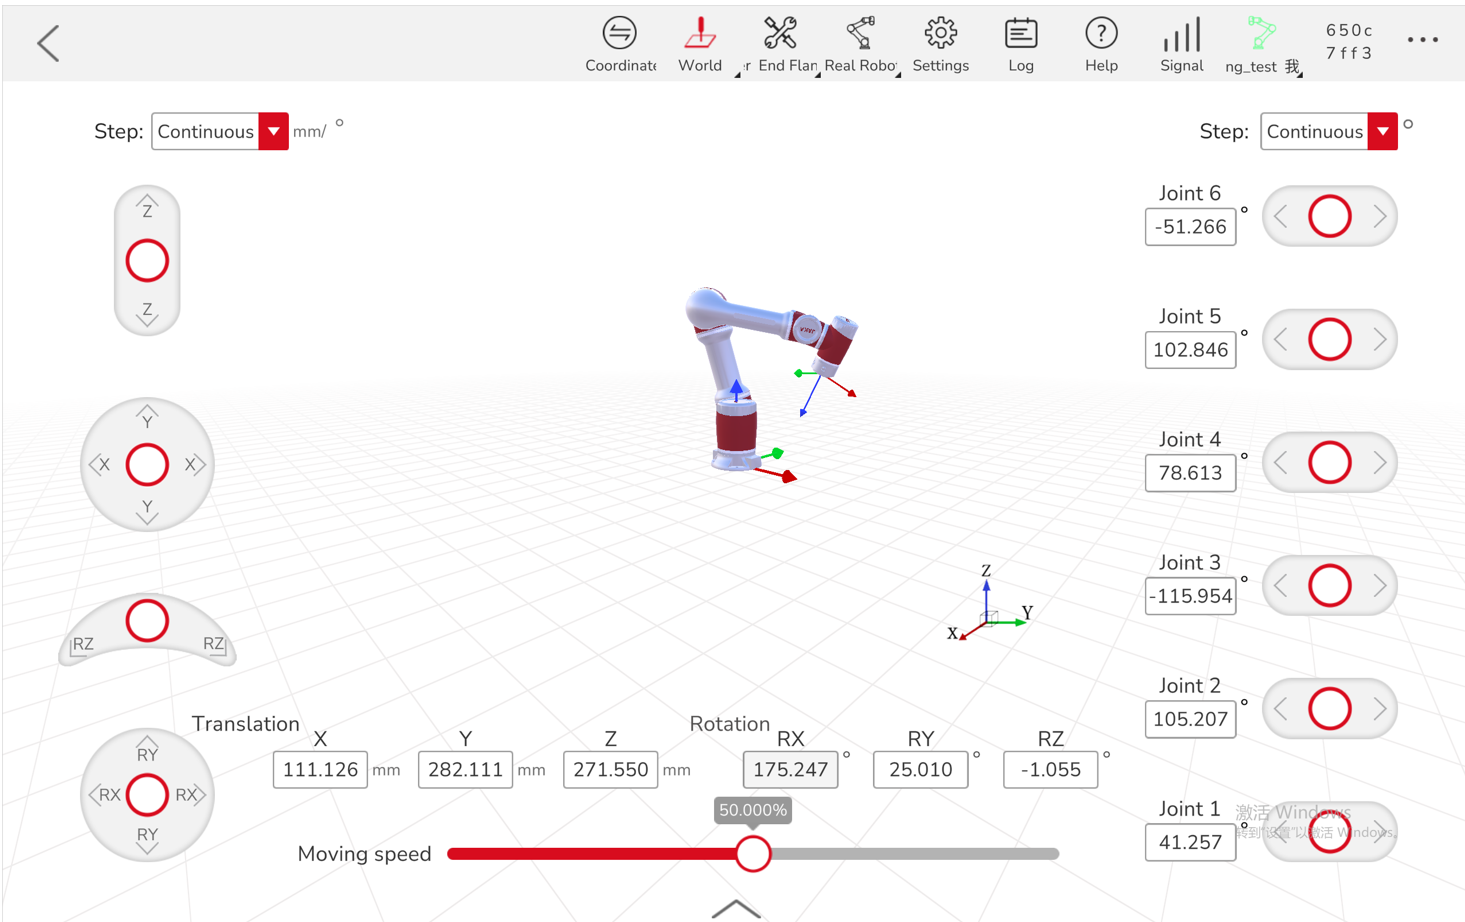
To command the robot to move in a linear motion in the user coordinate system, use the /jaka_driver/linear_move service with the required parameters as demonstrated below:
ros2 service call /jaka_driver/linear_move jaka_msgs/srv/Move "{
  pose: [111.126, 282.111, 271.55, 3.142, 0, -0.698],
  has_ref: false,
  ref_joint: [0],
  mvvelo: 100,
  mvacc: 100,
  mvtime: 0.0,
  mvradii: 0.0,
  coord_mode: 0,
  index: 0
}"
Important: The pose parameters in this example are for reference only. Ensure that the pose values are within the robot's workspace and do not result in singularities or exceed motion limits.

3) Computing Forward Kinematics
To calculate the forward kinematics of the robot given joint positions, call the /jaka_driver/get_fk service with the required input parameters as shown below:
ros2 service call /jaka_driver/get_fk jaka_msgs/srv/GetFK "{
joint: [0, 1.57, -1.57, 1.57, 1.57, 0]
}"

4) Computing Inverse Kinematics
To determine the joint configuration required to achieve a specific Cartesian pose, use the /jaka_driver/get_ik service with the appropriate input parameters as follows:
ros2 service call /jaka_driver/get_ik jaka_msgs/srv/GetIK "{
ref_joint: [0, 1.57, -1.57, 1.57, 1.57, 0],
cartesian_pose: [130.7, 116, 291, 3.13, 0, -1.5707]
}"

4.1.3 Running Executables in the JAKA Driver Package
In addition to the jaka_driver node, the JAKA driver package includes other executables for basic testing of certain services and SDK functions available in the jaka_driver package. These executables allow you to interact with the robot in different ways, test specific services, and verify robot functionality. Below are the necessary steps and examples for running these executables.
1) Running the Servo J Executable
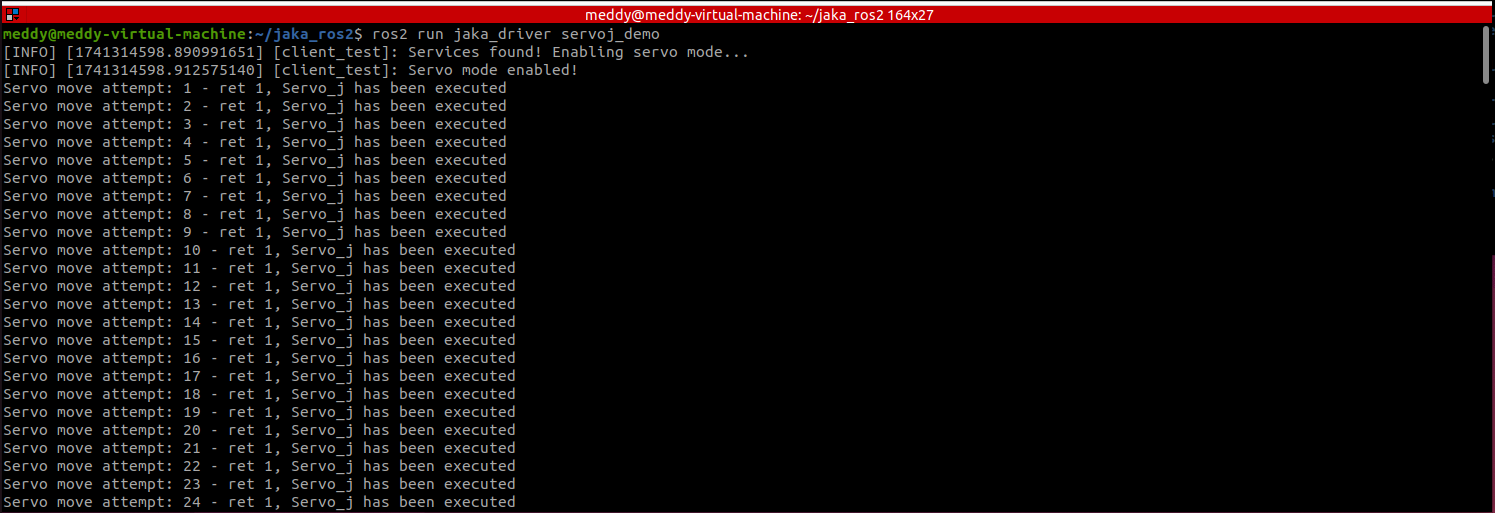
The servoj_demo executable is used to test the robot's servo mode by enabling it and commanding the robot to move incrementally to specific joint positions. This executable tests the /jaka_driver/servo_move_enable and /jaka_driver/servo_j services, which control the robot's joint motion in servo mode.
To run the executable, first ensure that the jaka_driver node is running. Use the following command to launch the driver and establish a connection to the robot:
ros2 launch jaka_driver robot_start.launch.py ip:=<robot_ip>
Note: Replace
<robot_ip>with the actual IP address of your robot.
Then, launch the executable with the following command:
ros2 run jaka_driver servoj_demo
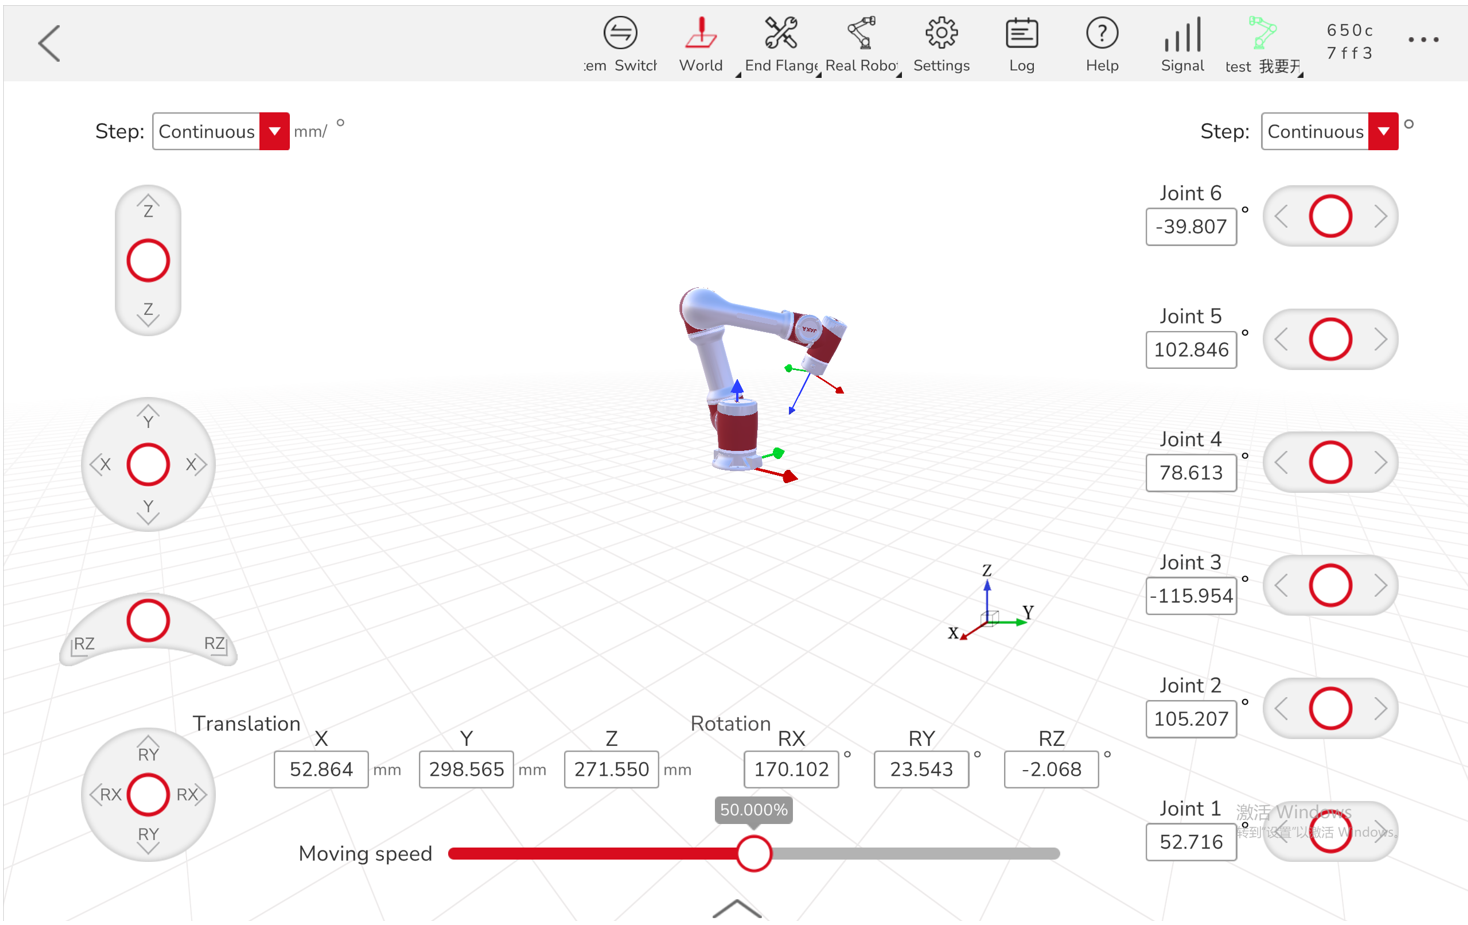
This will enable the servo mode and start executing joint movements. The servo motion will move the robot incrementally to the specified joint positions, demonstrating its basic control functionality.
2) Running the Client Executable
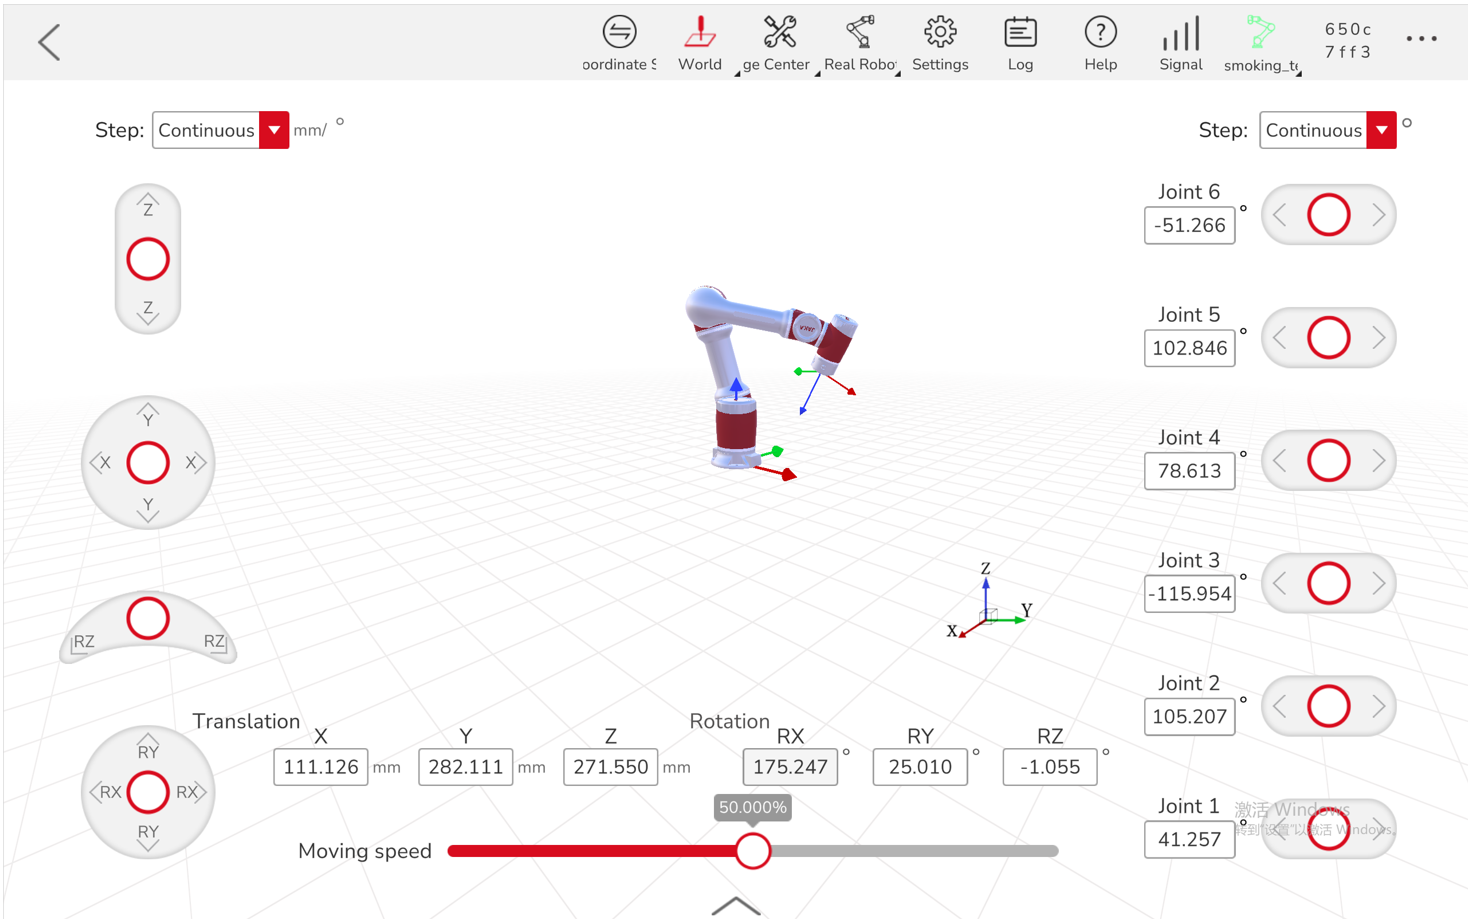
The client executable is a service client node designed to test the /jaka_driver/linear_move service. This executable sends a request to the linear_move service to move the robot to a specific Cartesian position in its workspace.
To use the client, ensure that the jaka_driver node is running first. Use the following command to launch the driver and establish a connection to the robot:
ros2 launch jaka_driver robot_start.launch.py ip:=<robot_ip>
Note: Replace
<robot_ip>with the actual IP address of your robot.
Then, in another terminal, execute the following command:
ros2 run jaka_driver client <x_position>, <y_position>, <z_position>, <rx>, <ry>, <rz>
Note: Replace
<x_position>,<y_position>,<z_position>,<rx>,<ry>,<rz>with the desired Cartesian coordinates and orientation for the robot's target pose. Ensure these values are within the robot’s workspace and avoid singularities.
Example:
ros2 run jaka_driver client 111.126, 282.111, 271.55, 3.142, 0, -0.698

3) Running the SDK Test Executable
The sdk_test executable connects to the robot at the specified IP address and verifies communication with the robot by enabling it and retrieving the current joint positions. This serves as a basic verification step to ensure that the robot is powered on and the connection is functional.
The executable accesses the robot's current joint positions using the SDK and displays the retrieved values. Unlike the previous two executables, sdk_test does not require the jaka_driver node to be running, as it automatically powers on the robot and enables it.
To run the SDK test, simply execute the following command:
ros2 run jaka_driver sdk_test --ros-args -p ip:=<robot_ip>
Note: Replace
<robot_ip>with the actual IP address of your robot.

4.2. MoveIt 2 Tutorial: Planning and Execution
MoveIt 2 is a powerful motion planning framework that enables trajectory planning and execution for robotic arms. While the updated jaka_ros2 package now supports Gazebo simulation for real-time trajectory execution, it still provides an RViz-based simulation mode for cases where Gazebo cannot be used due to system limitations, hardware constraints, or other requirements.
To enable this RViz simulation mode, modifications are required in the launches.py file that comes with the default MoveIt 2 package installation. The jaka_ros2 package provides an adjusted version of this file, which users can replace in their system to achieve the desired functionality.
The key modification made to launches.py is the addition of the use_rviz_sim parameter. When set to true, this parameter enables simulation mode. By default, use_rviz_sim is set to false.
4.2.1 Setting Up MoveIt 2 with JAKA Robot (RViz Simulation)
- Ensure that MoveIt 2 and the
jaka_ros2package are properly installed. - Replace the default
launches.pyfile with the modified version provided in thejaka_ros2package (launches.py). You can use thefindcommand to locatelaunches.pyin the MoveIt 2 installation directory as shown below.

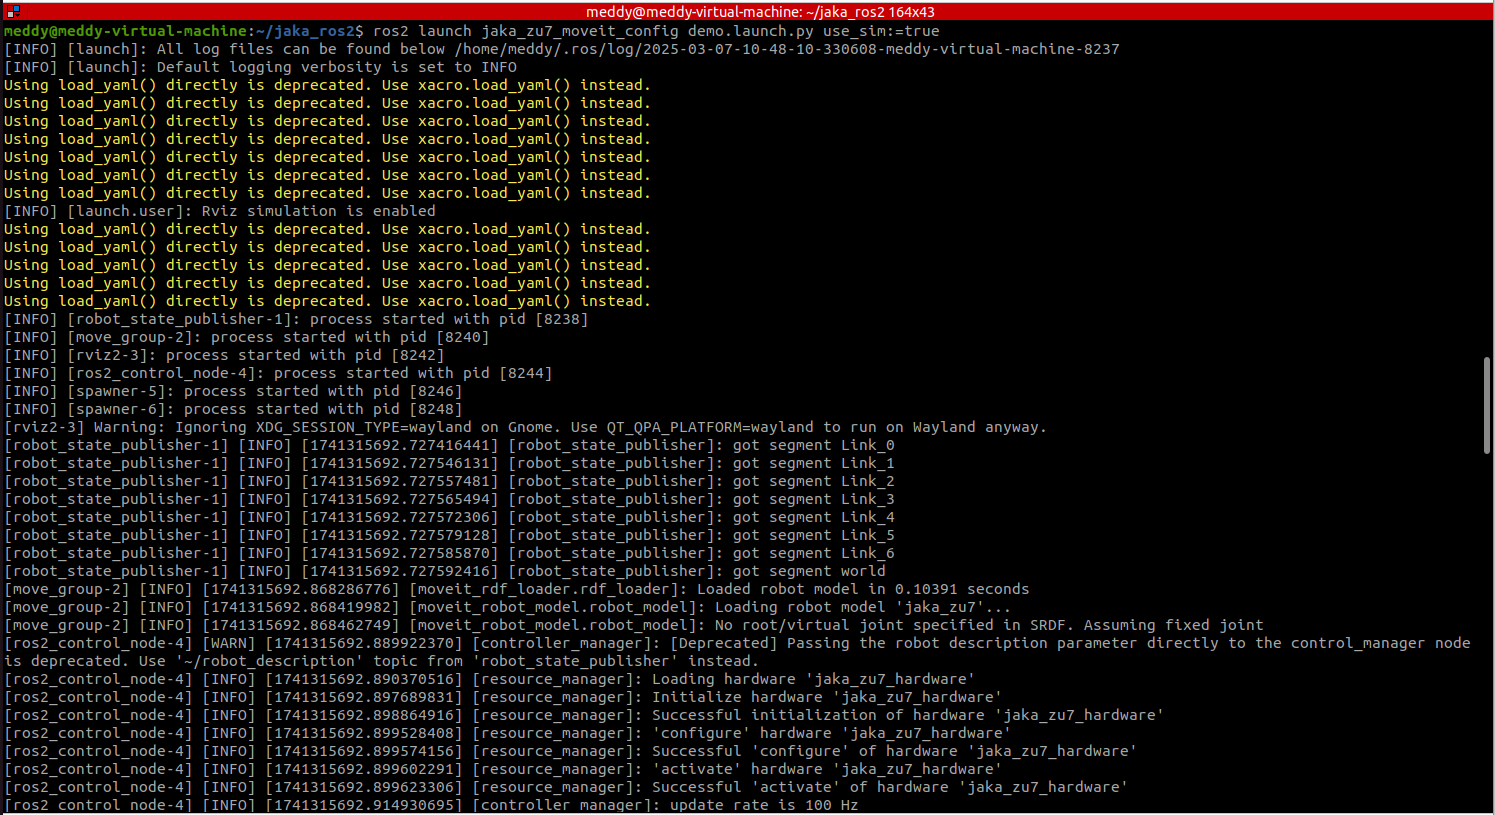
- Launch MoveIt 2 in RViz simulation mode using the following command:
ros2 launch jaka_<robot_model>_moveit_config demo.launch.py use_rviz_sim:=true
Note: Replace
<robot_model>with the appropriate JAKA robot model name (e.g.,zu3,s5,a12,minicobo, etc.).
4.2.2 Planning and Executing a Trajectory
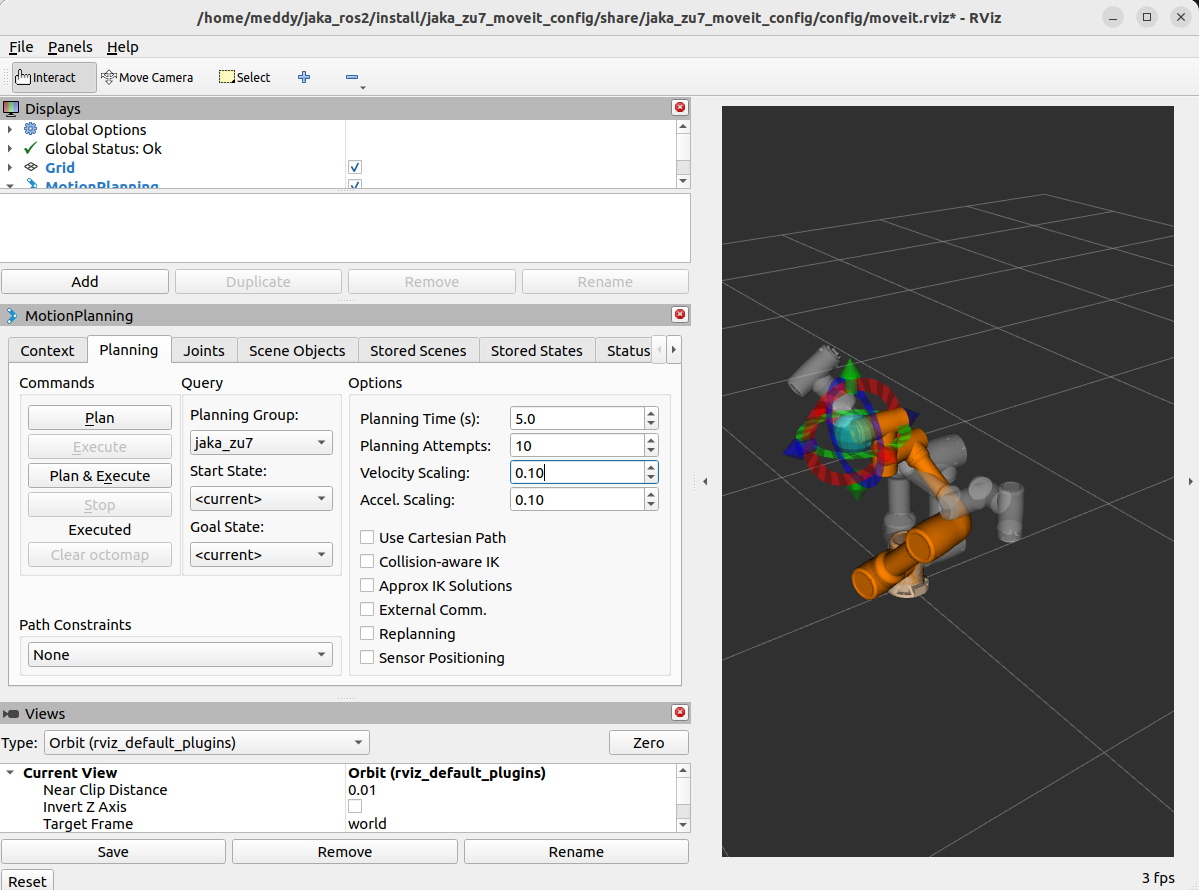
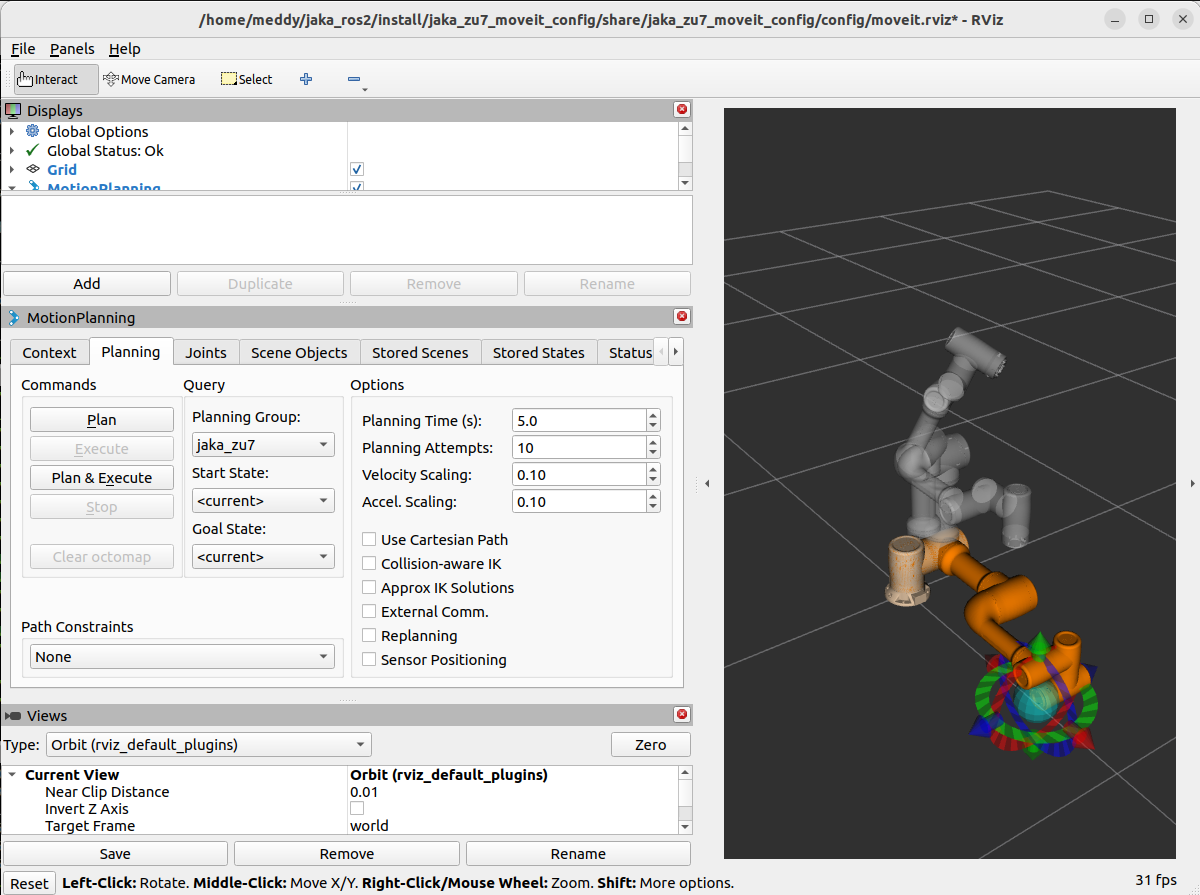
- Once RViz is launched, the robot model will be displayed in the environment.
- Move the interactive marker (represented as a ball at the robot’s end-effector) to the desired target position, or select a target pose from the "Goal state" of the RViz interface.
- Click "Plan & Execute" to generate and visualize the robot's trajectory.
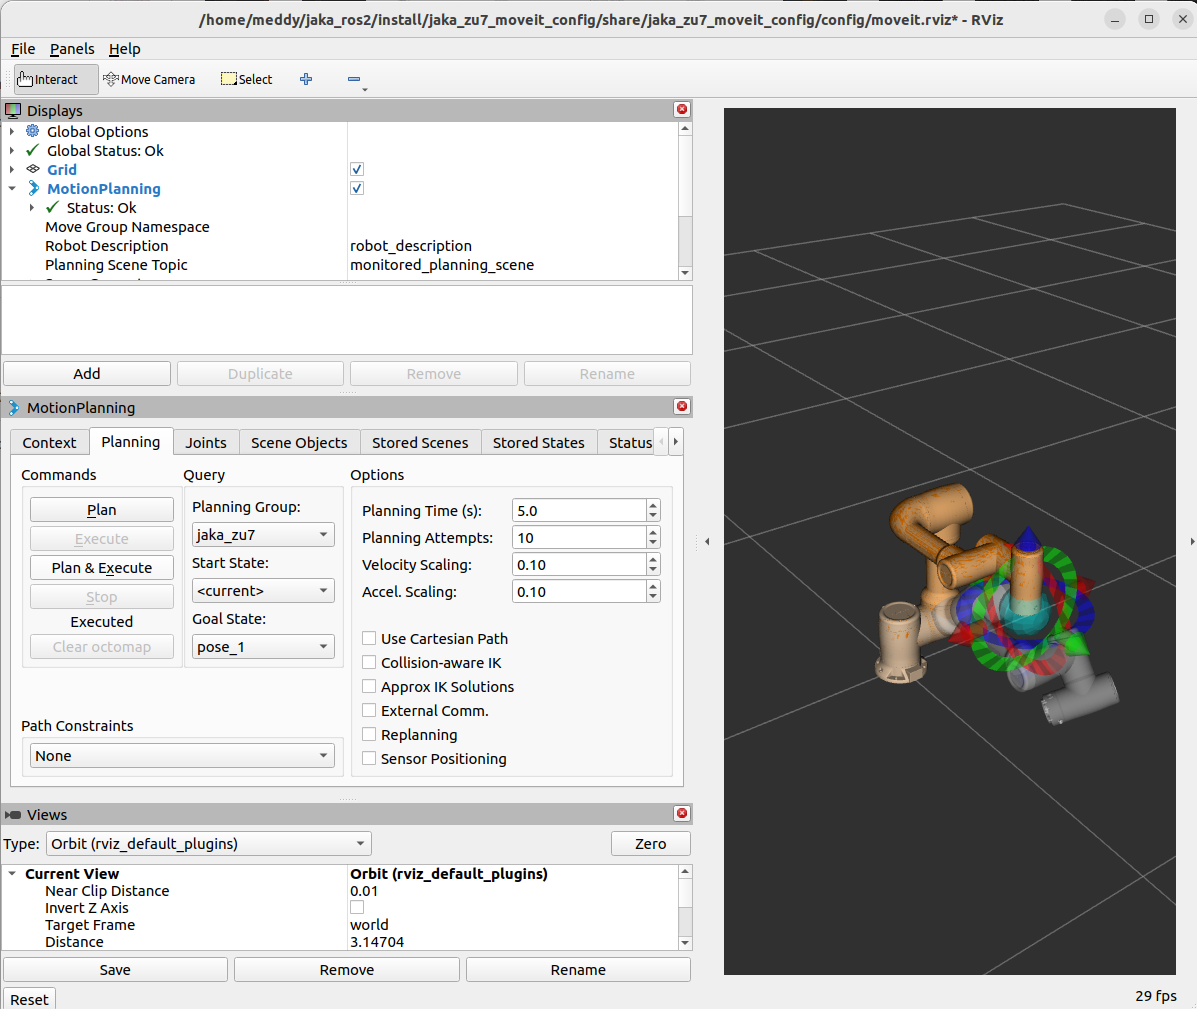
This approach allows users to perform trajectory planning and execution within the RViz environment without a physical JAKA robot or 3D simulation software tool, ensuring flexibility and broader accessibility in various development environments.
4.3 Gazebo Simulation Tutorial: Real-Time Trajectory Execution in Gazebo
Gazebo is a powerful simulation environment that provides realistic physics and visualizations for robotics applications. In this section, we demonstrate how to use Gazebo with the jaka_ros2 package to simulate real-time trajectory planning and execution in a simulation environment.
Similar to the RViz simulation described in Section 4.2, this tutorial uses customized launch files (i.e., a modified launches.py). The key modification made to launches.py is the addition of functions used to independently launch Gazebo for model visualization and to launch an integrated Gazebo simulation environment with RViz.
4.3.1 Setting Up Gazebo Simulation with JAKA ROS2
1) Ensure required packages are installed:
Before proceeding, make sure that Gazebo Ignition Fortress and the jaka_ros2 package are properly installed.
2) Update customized launch files:
Replace the default launches.py file with the customized version provided by the jaka_ros2 package (details in Section 4.2.1).
3) Launch Gazebo for Model Visualization Only:
To visualize the JAKA robot model in Gazebo, run the following command using the customized gazebo.launch.py file:
ros2 launch jaka_<robot_model>_moveit_config gazebo.launch.py
Note: Replace
<robot_model>with the appropriate JAKA robot model name (e.g., zu3, s5, a12, minicobo, etc.).
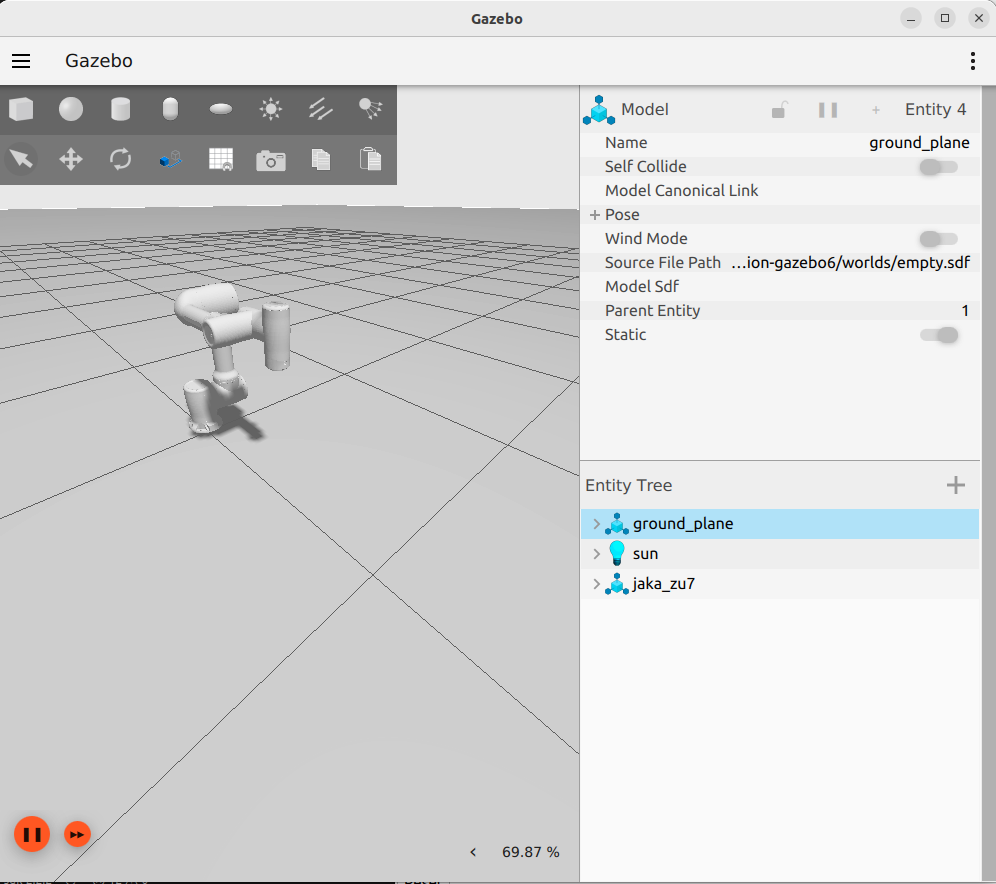
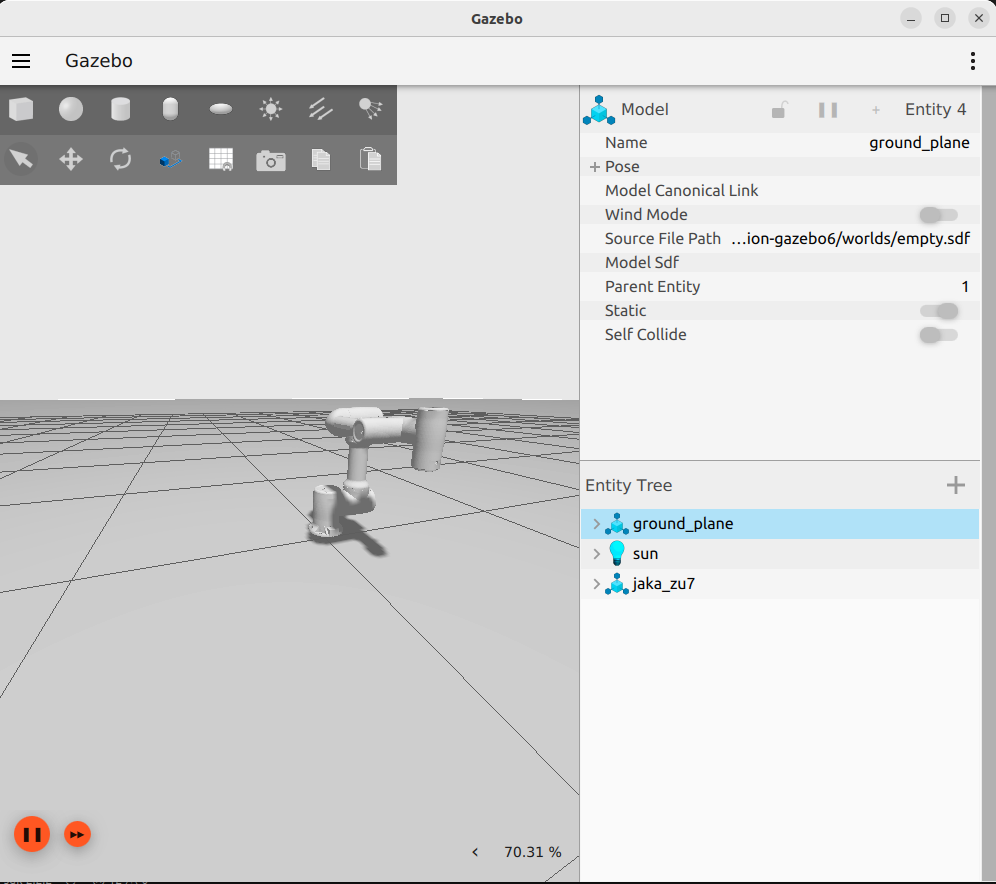
This command starts Gazebo Fortress with the default world (an empty world containing only a ground plane and a light source) and spawns the robot based on the published robot description. The robot will be visible in the Gazebo GUI for inspection.

4) Launch Gazebo with RViz for Trajectory Planning and Execution:
To enable real-time trajectory planning and execution in a simulation environment, run the demo_gazebo.launch.py file that integrates Gazebo with RViz:
ros2 launch jaka_<robot_model>_moveit_config demo_gazebo.launch.py
Note: Replace
<robot_model>with the appropriate JAKA robot model name (e.g., zu3, s5, a12, minicobo, etc.).
4.3.2 Demonstrating Trajectory Execution in Gazebo
1) Launch the demo environment:
After following the steps in Section 4.3.1, the robot model will appear in both Gazebo and RViz environments.
2) Set the target pose:
- Move the interactive marker at the robot’s end-effector in RViz to the desired position.
- Alternatively, select a Goal State from the RViz interface.
3) Plan and execute the trajectory:
- In RViz, click "Plan & Execute" to generate and visualize the robot's trajectory.
- The robot in Gazebo should now execute the planned trajectory in real-time.

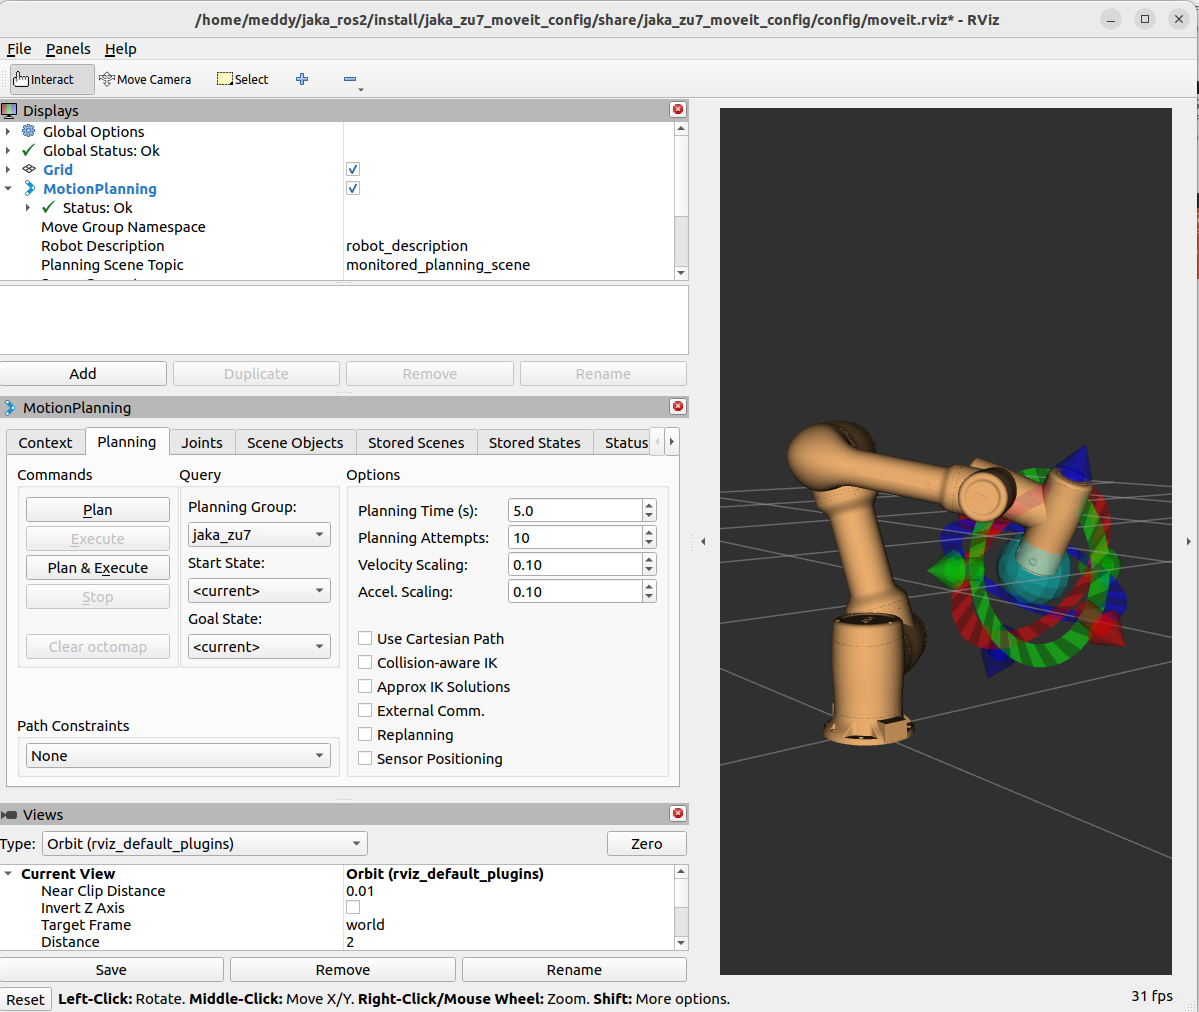
This process allows users to test motion planning and execution in gazebo simulation environment without requiring a physical robot.
4.4. Real Robot Tutorial: Controlling Real JAKA Robot
4.4.1 Safety Precautions & Robot Setup
Before controlling a real JAKA robot, it is essential to ensure proper setup and safety measures to prevent collisions, equipment damage, or potential hazards. This section outlines key safety considerations, payload configuration, and operational best practices.
1) Environment & Operational Safety
- Work Area Clearance: Ensure the robot's workspace is free of obstacles and personnel during operation. Define and enforce restricted zones if necessary.
- Power & Network Stability: Use a stable power supply and verify the network connection between the control PC and the robot to prevent unexpected interruptions.
- Emergency Stop Access: Familiarize yourself with the robot's emergency stop button and verify that it is functional before operation.
2) Safe Operating Zone and Motion Limits Configuration
- Collision Avoidance: Configure safety zone boundaries in the JAKA app to limit robot movement within a designated safe area.
- Monitor Joint Limits: Ensure that planned motions do not exceed the robot’s joint range limits to prevent overextension.
3) Payload Configuration
When attaching external tools such as grippers or other end-effectors, the payload settings must be updated to ensure accurate motion control and avoid excessive joint stress.
- Set Payload Parameters: Adjust the robot’s payload configuration based on the attached tool’s weight and center of mass using
/jaka_driver/set_payloadservice or on the JAKA app. - Verify Torque Limits: Excessive payloads can lead to joint overloading. Ensure the robot’s maximum payload limits are not exceeded.
- Tool Center Point (TCP) Calibration: Define an accurate TCP to improve motion precision and prevent tool misalignment or collision.
4) Motion Planning & Collision Checking
- Simulate Trajectories in RViz: Before executing a movement on the real robot, first plan and verify it in RViz to check for potential collisions, singularity errors, or out-of-range motions.
- Set Safe Motion Parameters: Define appropriate velocity and acceleration limits for safe execution using MoveIt 2 configuration files available for each robot model package or on the RViz interface.
4.4.2 Launching the jaka_planner Package
This section describes how to start the MoveIt 2 server and RViz to plan and execute trajectories with a real JAKA robot.
Precondition
Before launching the jaka_planner MoveIt 2 server, ensure that the jaka_driver server is not running, as MoveIt 2 and the JAKA ROS driver cannot operate simultaneously. If jaka_driver is active, stop it before proceeding.
Starting the MoveIt 2 Server
To launch the MoveIt 2 server, open a terminal and execute the following command, replacing <robot_ip> with the actual IP address of the robot and <robot_model> with the corresponding JAKA robot model you’re working with (e.g., zu3, s5, a12, minicobo, etc.):
ros2 launch jaka_planner moveit_server.launch.py robot_ip:=<robot_ip> robot_model:=<robot_model>
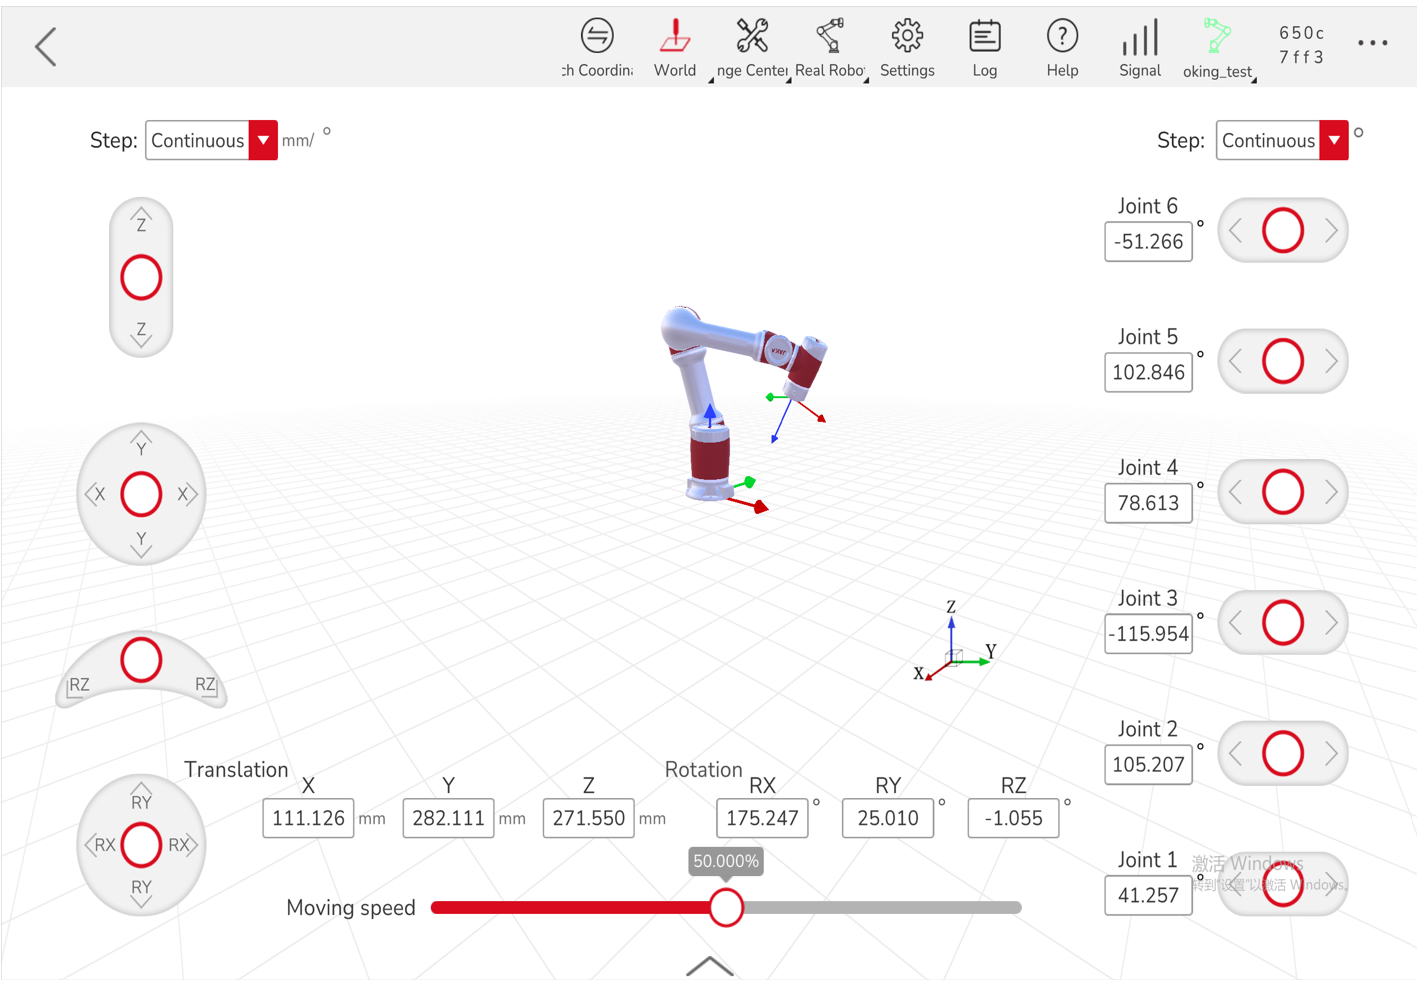
Starting the MoveIt 2 Client in Rviz
In a new terminal, start the MoveIt 2 RViz interface using the following command replacing <robot_model> with the appropriate JAKA robot model name you used above:
ros2 launch jaka_<robot_model>_moveit_config demo.launch.py
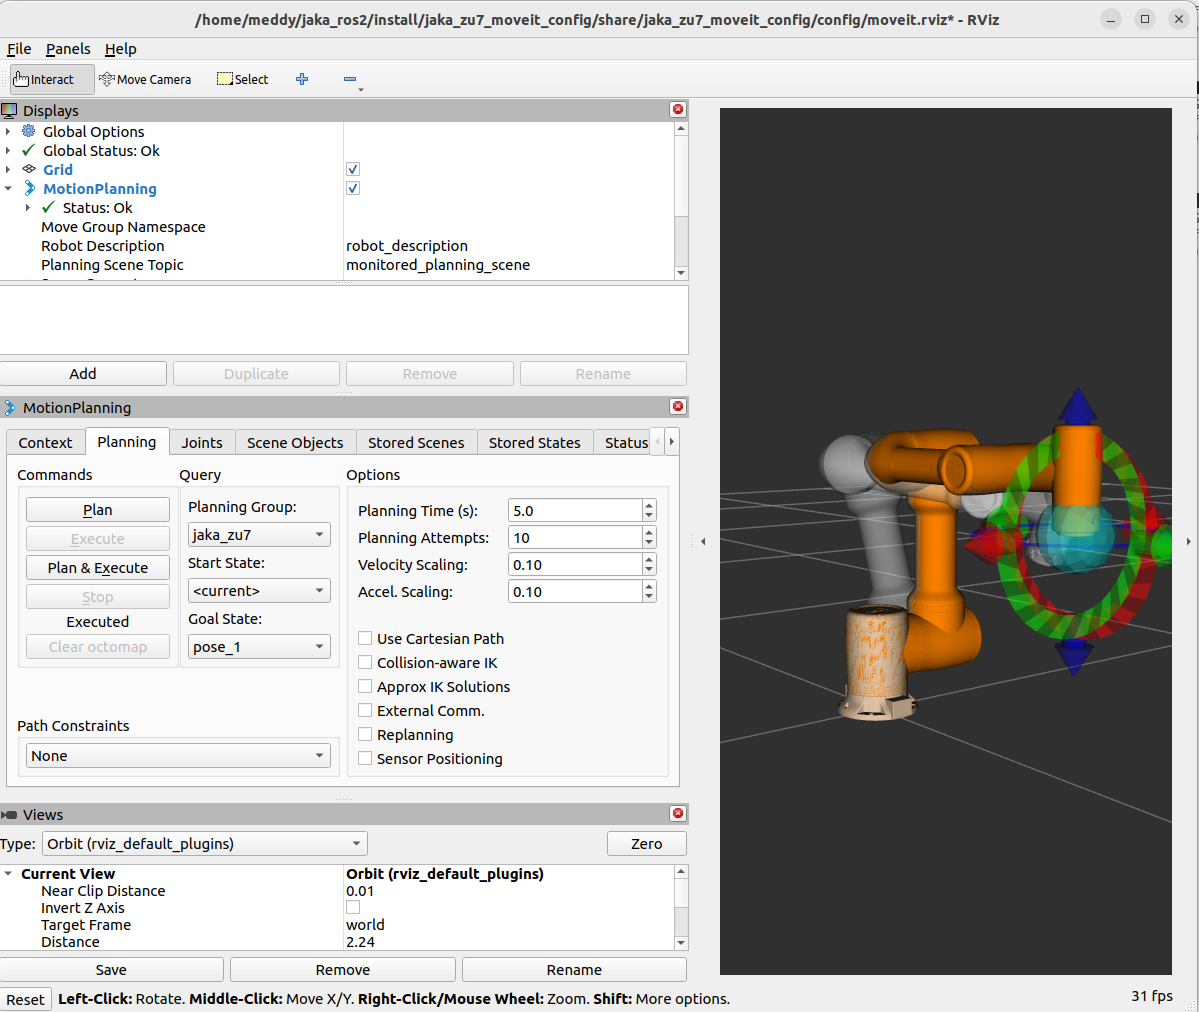
Once launched, the RViz interface will open, displaying the robot model. The visualization should reflect the current real-world position and orientation of the physical robot.
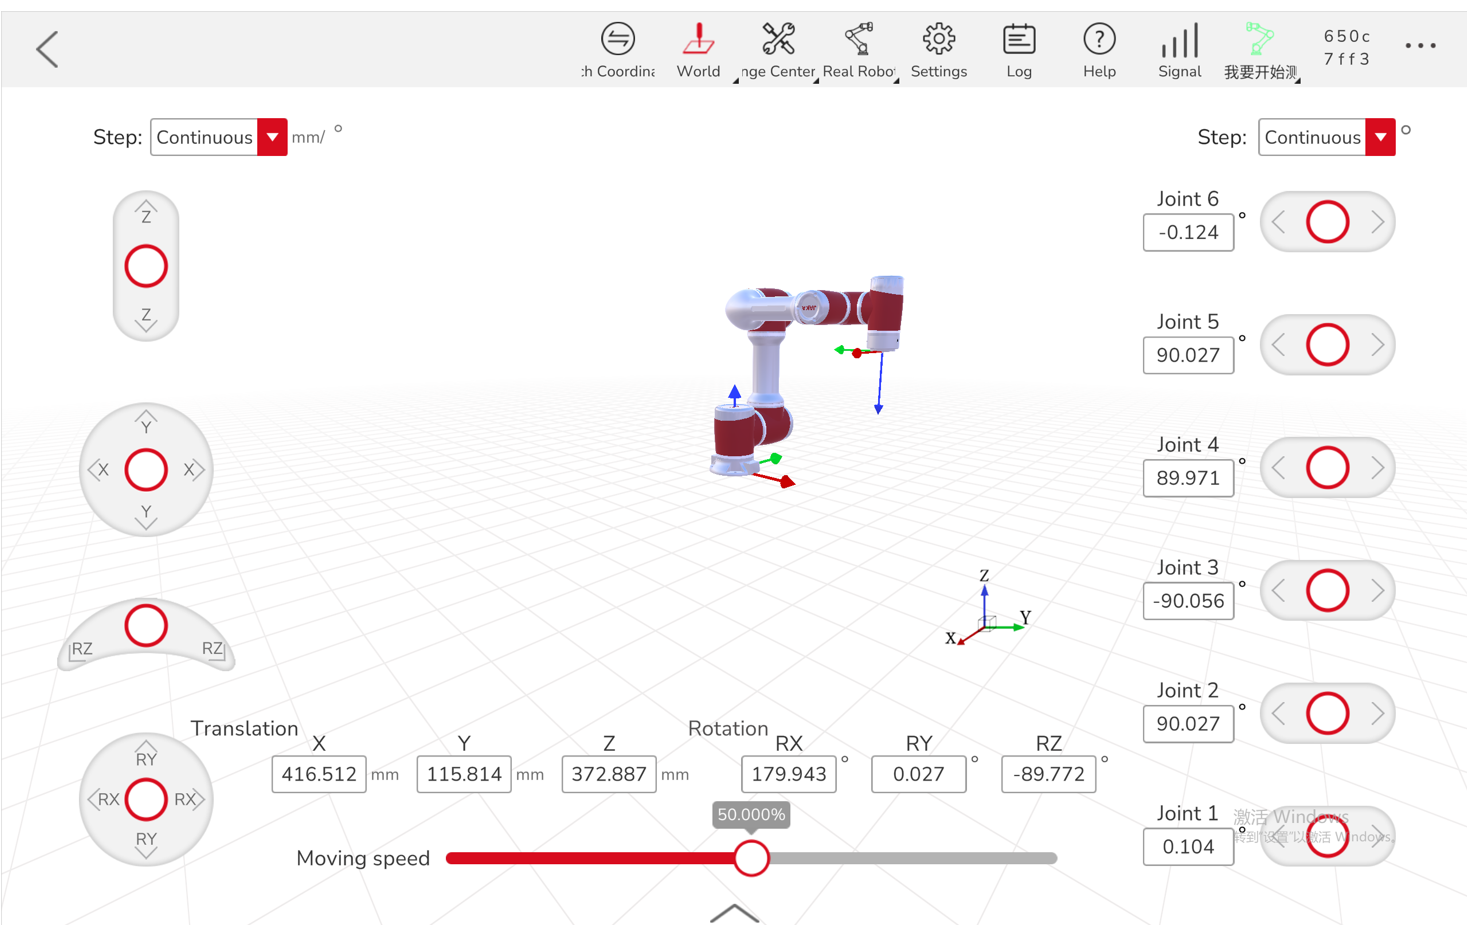

Note: The default value of use_rviz_sim parameter is false, so when using Moveit 2 and Rviz with a real robot, there is no need to explicitly specify
use_rviz_sim:=falseunless you want to ensure clarity.
4.4.3 Planning & Executing Trajectory in RViz with Real Robot
Once the MoveIt 2 server and RViz interface are running, you can plan and execute trajectories directly from RViz. In RViz, you can plan and execute motions for the JAKA robot using interactive markers.
When defining a target position, there are two execution methods:
1) Plan & Execute (Not Recommended for Initial Testing)
- Drag the interactive marker at the end-effector to the desired location, or select a target pose from the "Goal state" of the RViz interface.
- Clicking "Plan & Execute" will generate a trajectory and immediately send it to the robot for execution.
- This approach executes the motion in real time without prior visualization, which may lead to unexpected movements if the target position is unreachable or causes a collision.
- Use this method only when you are certain that the trajectory to the target position is safe.
2) Recommended Approach – Plan First, Then Execute
- Drag the interactive marker at the end-effector to the desired location, or select a target pose from the "Goal state" of the RViz interface.
- Click "Plan" to generate and visualize the trajectory in RViz before executing it.
- If the trajectory is safe and feasible, click "Execute" to send the motion command to the robot.
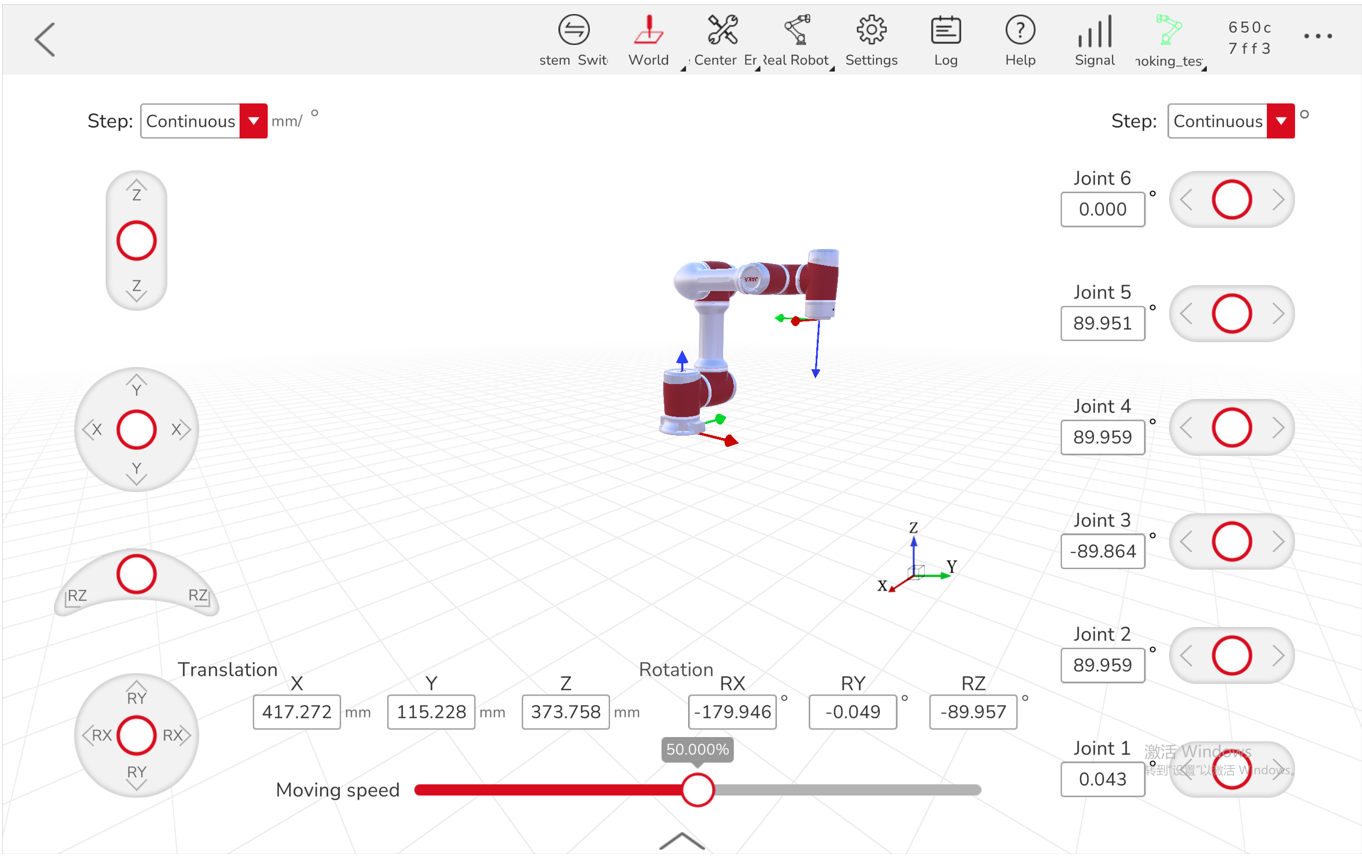
4.5. Running moveit_test for Basic Motion Testing
The moveit_test executable provides a simple way for users to test MoveIt 2's motion planning and execution on a JAKA robot. It serves as an initial verification step for newcomers to see how the JAKA ROS 2 package interacts with and controls JAKA robots. This test can be performed using a real robot, in RViz simulation mode, or with Gazebo simulation.
Purpose of moveit_test
- Provides an easy starting point for users to verify motion control with MoveIt 2.
- Helps test communication between JAKA ROS 2 package and JAKA robots.
- Allows users to validate the robot’s motion planning in joint space using a predefined sequence of joint space movements.
4.5.1 Running moveit_test with Real Robot
To perform the test with a real robot, ensure the MoveIt server is running before executing moveit_test.
Run the following commands in separate terminals:
ros2 launch jaka_planner moveit_server.launch.py ip:=<robot_ip> model:=<robot_model>
ros2 launch jaka_<robot_model>_moveit_config demo.launch.py
ros2 run jaka_planner moveit_test --ros-args -p model:=<robot_model>
Note:
- Replace
<robot_ip>with the actual IP address of the robot.- Replace
<robot_model>with the corresponding JAKA robot model.- For moveit_test, the default robot model is set to
zu3in the code. If using a different model, specify it in the startup command (-p model:=<robot_model>).


4.5.2 Running moveit_test in RViz Simulation Mode
To perform the test in RViz simulation mode without a physical robot or 3D simulation software tools (like gazebo), omit the MoveIt server launch and start the RViz demo with the use_rviz_sim parameter set to true.
Run the following commands in separate terminals:
ros2 launch jaka_<robot_model>_moveit_config demo.launch.py use_rviz_sim:=true
ros2 run jaka_planner moveit_test --ros-args -p model:=<robot_model>
Note: Replace
<robot_model>with the corresponding JAKA robot model.

4.5.3 Running moveit_test with Gazebo Simulation
To perform the test with gazebo simulation without a physical JAKA robot, omit the MoveIt server launch and launch gazebo or demo gazebo with RViz.
1) Running moveit_test on Independent Gazebo Simulation:
Run the following commands in separate terminals:
ros2 launch jaka_<robot_model>_moveit_config gazebo.launch.py
ros2 run jaka_planner moveit_test --ros-args -p model:=<robot_model>
Note: Replace
<robot_model>with the corresponding JAKA robot model.
2) Running moveit_test on Demo Gazebo Simulation with RViz:
Run the following commands in separate terminals:
ros2 launch jaka_<robot_model>_moveit_config gazebo.launch.py
ros2 run jaka_planner moveit_test --ros-args -p model:=<robot_model>
Note: Replace
<robot_model>with the corresponding JAKA robot model.
